-

FEATURED IN OUR SUMMER ISSUE
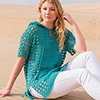
Design by Iassia Kryvonos
This eye-catching garment is worked from deliciously soft cotton yarn, featuring a ...
-

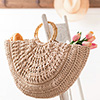
FEATURED IN OUR SUMMER ISSUE
Design by Shabnam Mirzaei
This durable hat made from raffia is the perfect beach accessory but is also stylish ...
-

FEATURED IN OUR SUMMER ISSUE
Design by Dana Rebmann for Yarnovations.com
Hens are known for clucking, but these southern belles are great listeners. Crochet a ...
-
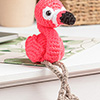
FEATURED IN OUR SUMMER ISSUE
Design by Marti Cross of Flawsome Stitches Crochet
Fernando is small and a bit shy. Designed so that he may sit on a desk or mantel, Fernando ...
-
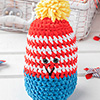
FEATURED IN OUR SUMMER ISSUE
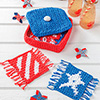
Design by Kathleen Stuart
Amigurumi is so popular because people love stuffed animals. This firecracker can be a ...
-
FEATURED IN OUR SUMMER ISSUE
Design by Karen Barnes
This sturdy bag expands when filled so you can take it on shopping trips with you while ...
-
FEATURED IN OUR SUMMER ISSUE
Design by Joyce Geisler
This is a great project for stitchers who are new to filet crochet, as it has an easy-to ...
-

FEATURED IN OUR SUMMER ISSUE
Design Tessa Hutchison
Here's a great way to use up small amounts of special hand-dyed and luxury yarns. The open ...
-
FEATURED IN OUR SUMMER ISSUE
Design by Lena Skvagerson
This popular Annie's Signature Designs pattern with its flattering split sides, trendy ...
-
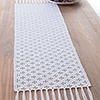
FEATURED IN OUR SUMMER ISSUE
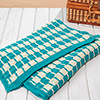
Design by Kathleen Berlew
This striking two-tone blanket is an easy introduction to mosaic crochet, using elements ...
-

FEATURED IN OUR SUMMER ISSUE
Design by K. Calliste Hawke
Two sleeve lengths and the ability to wrap it around your neck or provide coverage for ...
-
FEATURED IN OUR SUMMER ISSUE
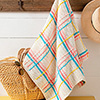
Design by Kristen Stolzfus Clay
This stylish blanket is perfect for a day at the beach or a summer picnic at the park. ...
-

FEATURED IN OUR SUMMER ISSUE
Design by Jennifer Olivarez
With its combination of bold lace diamonds and delicate shell eyelet stitches, this unique ...
-
FEATURED IN OUR SUMMER ISSUE
Designs by Fire Side Crochet/Lisa Briggs
Whether you're enjoying a quiet morning coffee or hosting a lively ...
-
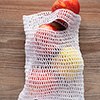
FEATURED IN OUR SUMMER ISSUE
Design by Christina Michelle of ByChristinaMichelle.com
This convenient market bag, in three sizes, is surprisingly strong, stretchy and washable, ...
-
FEATURED IN OUR SUMMER ISSUE
Design by Margaret Hubert
Have fun combining colors to create any of the three lengths of this unique top.
-

FEATURED IN OUR SUMMER ISSUE
Design by Kim Guzman
Practice some of your new drop stitch skills while making this stylish summer jacket.
-
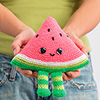
FEATURED IN OUR SUMMER ISSUE
Design by Fat Lady Crochet
Meet Watermelon Dude, the perfect summer companion with his cute smile and bright green ...
-
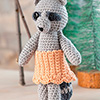
FEATURED IN OUR SUMMER ISSUE
Designs by Donna Childs
Rebecca is the third in a series of five woodland-inspired amigurumi ...


Follow Us On ...