


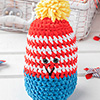


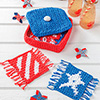


Scrap Project of the Month: October

Tassled Winter Toppers
Design by Sheila Leslie
These fun to crochet stripes are perfect for warming the little ones!
Skill Level
Easy
Size
Fits 19-20-inch-circumference head
Materials
Boy's Version- Medium (worsted) weight yarn: 1 3/4 oz (87 yds, 50g) blue (A); 1 oz (50 yds, 28g) dark blue (B); 3/4 oz (37 yds, 21g) each white (C) and red (D)
- Size I/9/5.5mm aluminum crochet hook or size needed to obtain gauge
- 3 1/2 x 2-inch piece of cardboard
- Medium (worsted) weight yarn: 1 3/4 oz (87 yds, 50g) light pink (A); 1 oz (50 yds, 28g) medium pink (B); 3/4 oz (37 yds, 21g) each white (C) and light green (D)
- Size I/9/5.5mm aluminum crochet hook or size needed to obtain gauge
- 3 1/2 x 2-inch piece of cardboard
Gauge
4 sc = 1 inch
Pattern Stitch
Long single crochet (long sc): Insert hook in st indicated on 2nd rnd below, yo and draw lp through st to height of working row, yo and draw through 2 lps on hook.
Instructions
- Starting at top of head with A, ch 4; join to form a ring.
- Rnd 1 (RS): Ch 3 (counts as a dc on this and following rnds), 7 dc in ring, join in 3rd ch of beg ch-3. (8 dc)
- Rnd 2: Ch 3, 2 dc in next dc; *dc in next dc, 2 dc in next dc; rep from * twice more; join in 3rd ch of beg ch-3. (12 dc)
- Rnd 3: Ch 3, dc in same ch as joining; 2 dc in each rem dc; join in 3rd ch of beg ch-3. (24 dc)
- Rnd 4: Ch 1, sc in same ch as joining and in each rem dc; join in first sc. Fasten off.
- Rnd 5: With C (for boy's version) or B (for girl's version) make slip knot on hook and join with sc in joining sl st, long sc (see Pattern Stitch) in next dc on 2nd rnd below; [sc in next sc, long sc in next dc on 2nd rnd below] 11 times; join in first sc. Fasten off.
- Rnd 6: Join A with sc in back lp of joining sl st of previous rnd; working in back lps only, sc in next 2 sc, 2 sc in next sc; *sc in next 3 sc, 2 sc in next sc; rep from * around, join in joining sc. (30 sc)
- Rnd 7: Ch 3, dc in next 3 sc, 2 dc in next sc; *dc in next 4 sc, 2 dc in next sc; rep from * around; join in 3rd ch of beg ch-3. (36 dc)
- Rnd 8: Ch 3, dc in next dc, 2 dc in next dc; *dc in next 2 dc, 2 dc in next dc; rep from * around; join in 3rd ch of beg ch-3. (48 dc) Fasten off.
- Rnd 9: Join D with sc in back lp of joining sl st; working in back lps only, sc in each dc; join in first sc. Fasten off.
- Rnd 10: Join C with sc in back lp of joining sl st; working in back lps only, sc in next 2 sc, 2 sc in next sc; *sc in next 3 sc, 2 sc in next sc; rep from * around; join in first sc. (60 sc)
- Note: On following rnd, to change color, work last st with old color until 2 lps rem on hook; with new color, yo and draw through 2 lps on hook. Work over color not in use.
- Rnd 11: Ch 1, sc in same sc and in next sc, changing to D in last sc (see Note); sc in next sc, changing to C; *sc in next 2 sc, changing to D in last sc; sc in next sc, changing to C; rep from * around; join in first sc. Fasten off D.
- Rnd 12: Ch 1, sc in same sc and in each rem sc; join in first sc. Fasten off.
- Rnd 13: Join D with sc in joining sl st; sc in next 3 sc, 2 sc in next sc; *sc in next 4 sc, 2 sc in next sc; rep from * around; join in first sc. (72 sc) Fasten off.
- Rnd 14: Join A with sc in back lp of joining sl st; working in back lps only sc in each sc; join in first sc.
- Rnd 15: Ch 3, dc in each sc; join in 3rd ch of beg ch-3.
- Rnd 16: Ch 3, dc in each dc; join in 3rd ch of beg ch-3. Fasten off.
- Rnd 17: Join B with sc in joining sl st; sc in each sc; join in first sc. Fasten off.
- Rnd 18: Join A with sc in back lp of joining sl st; working in back lps only, sc in each sc; join in first sc.
- Rnd 19: Ch 1, sc in same sc and in next sc, changing to B in last sc; sc in next 2 sc, changing to A in last sc; *sc in next 4 sc, changing to B in last sc; sc in next 2 sc, changing to A in last sc; rep from * to last 2 sc; sc in last 2 sc; join in first sc.
- Rnd 20: Ch 1, sc in same sc and in next sc, changing to B in last sc; *sc in next 3 sc, changing to A in last sc; sc in next 3 sc, changing to B in last sc; rep from * to last 4 sc; sc in next 3 sc, changing to A in last sc; sc in last sc; join in first sc.
- Rnd 21: Ch 1, sc in same sc and in next 2 sc, changing to B in last sc; sc in next 2 sc, changing to A in last sc; *sc in next 4 sc, changing to B in last sc; sc in next 2 sc, changing to A in last sc; rep from * to last sc; sc in last sc; join in first sc. Fasten off B.
- Rnd 22: Ch 1, sc in same sc and in each rem sc; join in first sc. Fasten off.
- Rnd 23: Join B with sc in joining sl st; sc in each sc; join in first sc. Fasten off.
- Rnd 24: Join A with sc in back lp of joining sl st; working in back lps only, sc in each sc; join in first sc. Fasten off.
Ear Flaps
First Ear Flap- Hold piece with RS facing you; sk next 13 sc from joining sl st, join A with sc in next sc.
- Rnd 1: Sc in next 12 sc, turn, leaving rem sc unworked. (13 sc)
- Row 2: Ch 1, sc in each sc, turn.
- Rows 3 & 4: Rep row 2.
- Note: For sc dec, draw up lp in each of 2 sts indicated, yo and draw through all 3 lps on hook.
- Row 5: Ch 1, sc dec (see Note) over first 2 sc; sc in each sc to last 2 sc; sc dec over last 2 sc, turn. (11 sc)
- Row 6: Ch 1, sc dec; sc in each sc to last 2 sc; sc dec, turn. (9 sc)
- Row 7: Ch 1, sc in each sc, turn.
- Rows 8 & 9: Rep row 6. (5 sc)
- Row 10: Ch 1, sc dec; sc in next sc; sc dec. (3 sc) Fasten off.
- Hold piece with RS facing you; sk next 20 sc on rnd 24 from First Ear Flap, join A with a sc in next sc.
- Rows 1-10: Rep rows 1-10 of First Ear Flap.
Edging & Ties
- Hold piece with RS facing you; join A with a sc in next sc on rnd 24 from Second Ear Flap; sc in next 25 sc; * work 9 sc along side of next ear flap, sc in next sc on row 10 of ear flap, sl st in next sc, ch 51, sc in 2nd ch from hook and in each rem ch; sl st in same sc as last sl st made-tie made; sc in next sc, work 9 sc along next side of ear flap, sc in next 20 sc, work 9 sc along side of next ear flap, sc in next sc on row 10 of ear flap, sl st in next sc, ch 51, sc in 2nd ch from hook and in each rem ch; sl st in same sc as last sl st made-tie made; sc in next sc, work 9 sc along next side of ear flap; join in first sc.
- Fasten off and weave in ends.
Tassel
Holding 1 strand of A and 1 strand B, wrap yarn 15 times around cardboard. Slip a strand of A under strands at top of cardboard and tie tightly. Slip off strands off cardboard. Cut bottom of strands. Tie 2nd strand of A tightly around all strands 3/4 inches below top. With A and leaving a 6-inch end, ch 6. Fasten off, leaving 6-inch end. Sew 1 end of ch to top of tassel. Sew other end of ch to top of hat. Trim ends of tassel.
© 2005. Annie's Attic. Annie's Scrap Crochet Club.
DOWNLOAD
Click here to download the PDF (2.1 MB)
| Other projects in the series: |
Other project series:


Follow Us On ...